SAP
The Procedure for Renewing the Dispatch Schedule is as below:-
1. Divisional SPOC has to login to the PTM module in SAP using Super-user credential shared during creation of dispatch schedule.
2. Go to “Edit Schedule” option under Schedule tab to get the schedule editing screen.
3. Enter the Schedule ID for which validity has to be extended.
4. Change the “Valid to” date as required and save the same.
5. Login to ECP module of SAP using Divisional head login and download the edited schedule using “ZMOSCHDWNLD”
6. Maintain the edited schedule under “ZMOIPVS” option.
7. After completion of all the above task, Share the schedule ID to tcsdop.sapipvs@tcs.com and tcsdop.pos@tcs.com with a copy of ipvs.cept@indiapost.gov.in,DMCC Chennai, RIT and CIT for pushing the edited schedule data to IPVS Back office.
In this connection, it is requested to direct all the Divisional SPOC to renew the dispatch schedules well in advance before the expiry date to avoid the issues in dispatching the articles in IPVS Back Office.
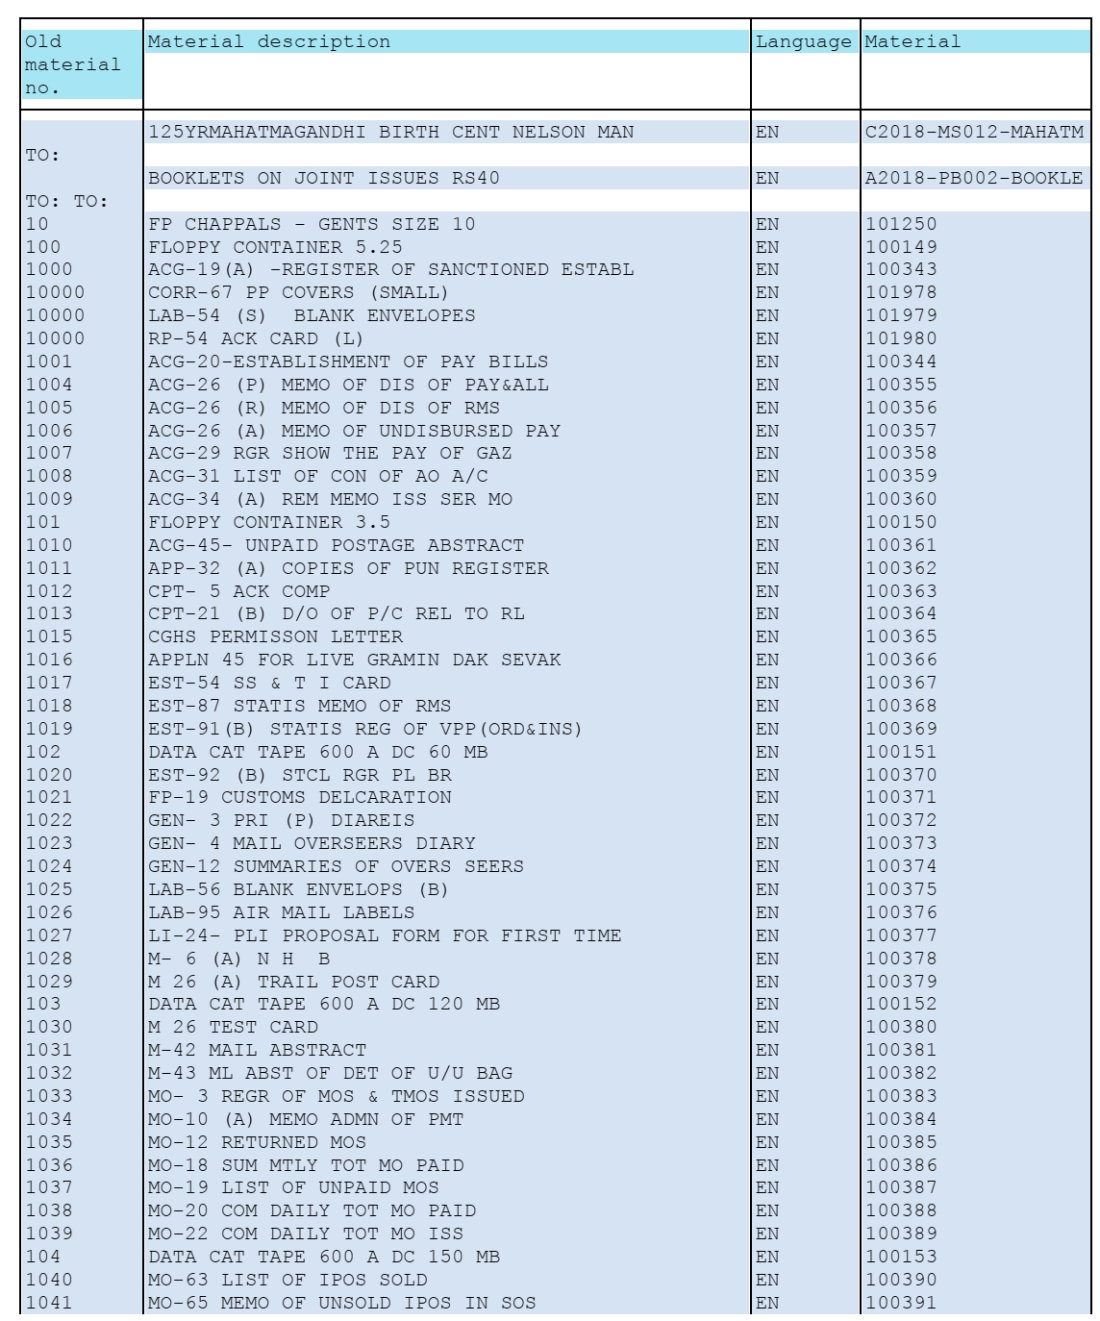
Forms Name and Material Number in CSI
UncategorizedBANK RECONCILIATION MADE EASY [CSI]
UncategorizedFirst note down House bank I’d and Bank key
FCHI
- House bank- click searcher
- Remove filter 500 and list
- Searcher – key in bank name
- (Note down for each bank)
FCHI
View red ink item (unadjusted item)
FAGLL03
- GL (Bank Drawings / Bank remittance for the state)
- Posting date (Select From and To as Last month)
- Custom selections : Year & PC
- F8(Copy it in Excel)
FAGLL03
Scroll Entry by schedule PA
FF67
- (Varient – DOPI , Type – 4)
- Bank key (Available from FCHI)
- Bank ac no (Available on PM Cheque)
- Currency : INR
- Statement no – (Scroll number)
- Statement date – current date
- Bank posting only – Tick
- Press three times
FF67
Trans : DP01 (For Remittance)
DP02 (For Drawings)
Profit center
Bank Ref : Chq No. For drawings
(Assignment in FAGLL03)
: Doc. No. For Remittance
(Doc. No in FAGLL03)
Amount : Amt
(Prefix minus symbol for drawings)
Doc. date : PO accounting date
Value date : scroll date
( Enter all row entries like this )
click GOTO – Change controls
(Press enter as many times as the number of row entries)
Finally, OB/CB screen will be displayed.
Opening balance : 0
Closing balance : Total amt.
(Prefix minus sign before the Total
Amt. in case of Drawings)
Click Tick
Click Tick
(Entered Amt & Bank Amt are tallied)
Save
Save
(A table of entries in Yellow colour will be displayed)
Verify the reconciliation by APM accounts
FEBAN
DOPI
House bank : (Available from FCHI)
Account I’d : click searcher
R00001 (For Remittance)
D00001 (For Drawings)
- Execute
- Click arrow in front of House bank
- (The scroll entries will be listed down)
- Select the red entry
- Post
FEBAN
(Drawings will be adjusted then and there)
For Remittance :
Click document
Enter doc no in From & To
Post
(Do these for each entry)
(The entries in FEBAN screen will be Green.)
- Check in FAGLL03 and verify the entries are Green now. Note that Clearing document column are filled with document numbers. Export to Excel.
View the reconciliation report
Zfi_Recon
(Dont worry .This won’t work..!!)
So FAGLL03 Report is enough.
Note 1 : The reconciled amount will appear in the DAC of that profit center on both Receipts and Payments under Bank reconcile GL for drawings and Remittance.
Note 2 : The cheques from BNPL customers received as monthly bill will have to be adjusted like this in Bank reconciliation process so as to get accounted in the respective customer’s account
Zfi_Recon
So FAGLL03 Report is enough.
How to Add Post Master’s New Cheque Book to the Cheque lot in CSI Post Office?
Uncategorized1. Go to transaction FCHI. Enter the below details.
| Company code | DOPI |
| House Bank | Bank number |
| Account Id | D0001 |
2. Click on the Change(Pencil Icon) button as shown in the below screenshot.
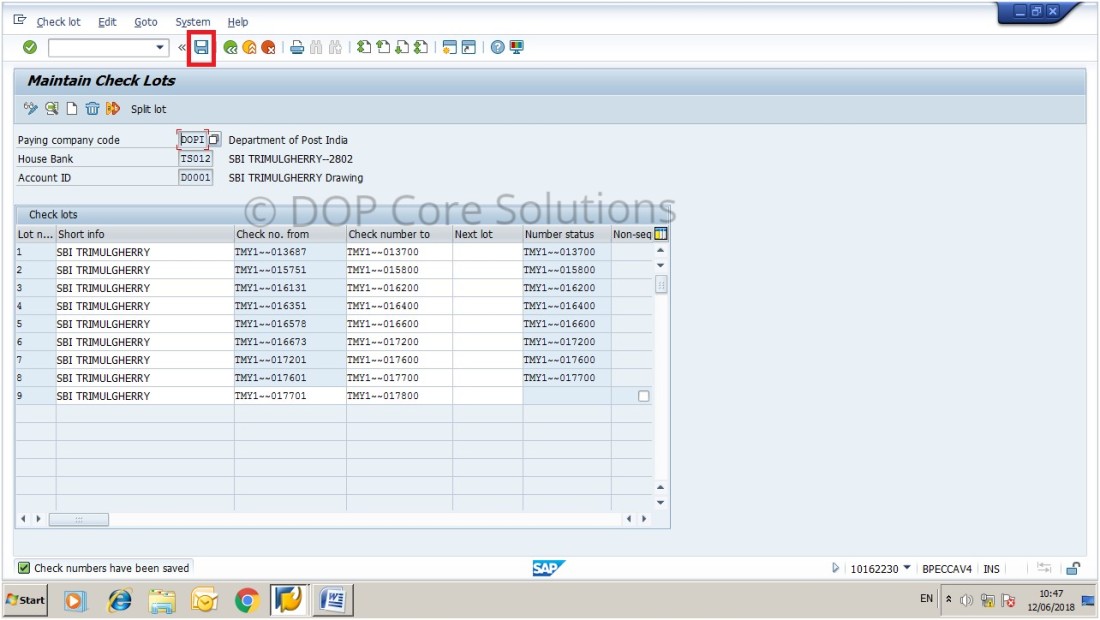
3. Now click on the New button as shown in below screenshot
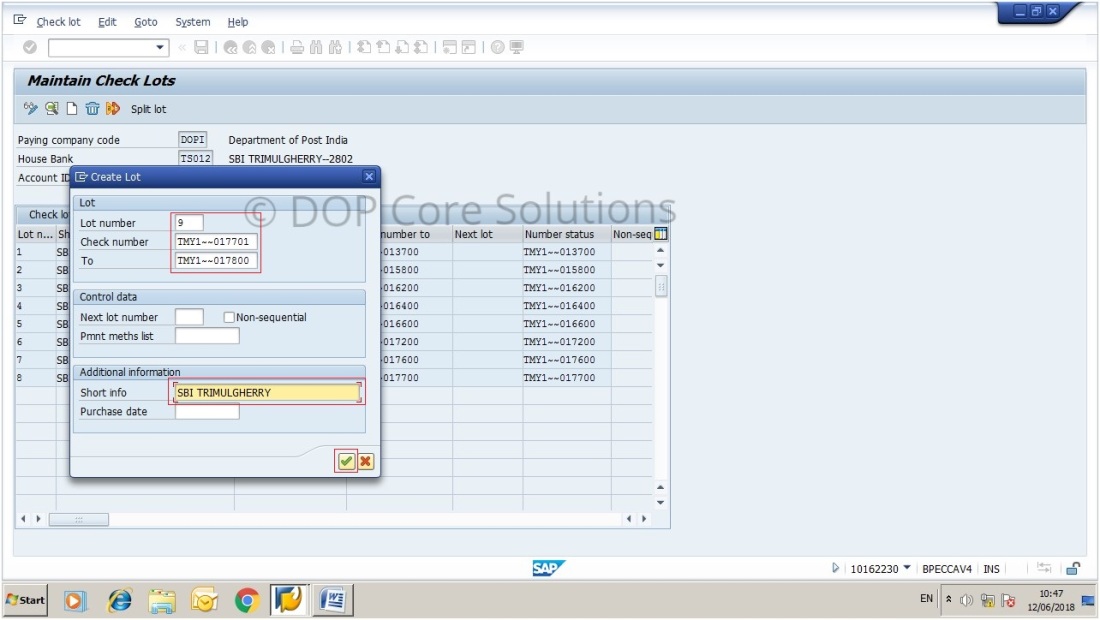
4. Now a new popup window will open as shown in the below screenshot.
Enter the below details
| Lot number | If you using the second checkbook then, it should be 2 and so on. |
| Check number | Starting number of the cheque book. |
| To | Ending number of the cheque book. |
| Short Info | Your Bank Name |
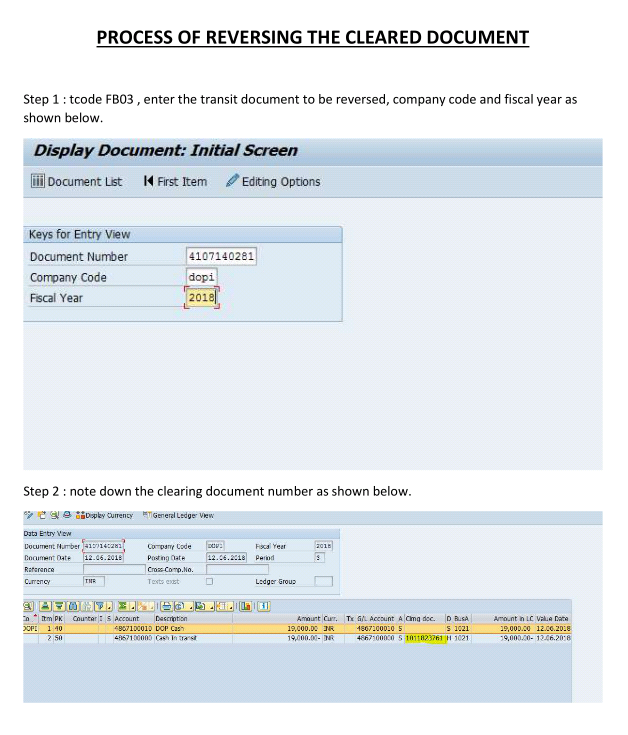
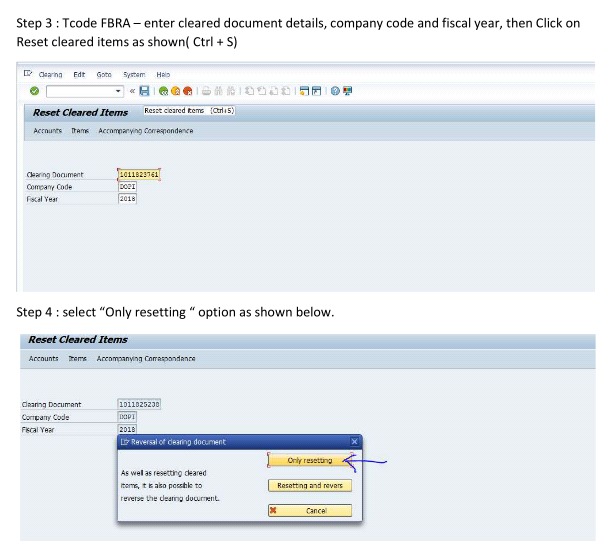
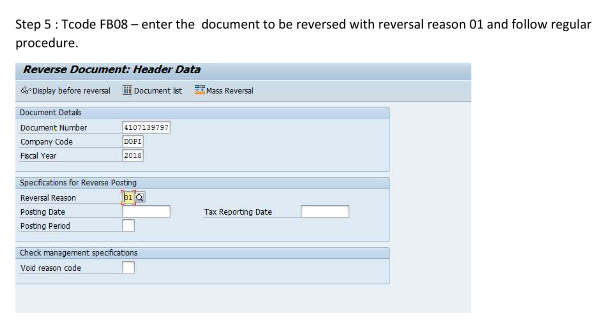
Process of Reversing The Cleared Document in SAP – CSI
UncategorizedHow to check opening and closing balance of Postage Stamps/Revenue Stamps/Any Stock material in SAP – CSI
Uncategorized1. Go to Transaction MB5B
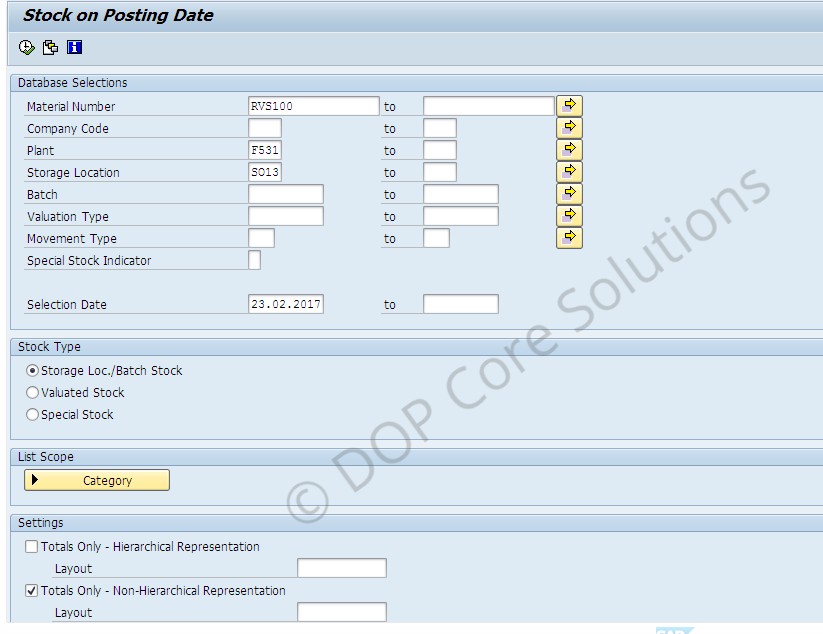
2. Below screen appears. Now enter the plant, Storage location combination for your office and the material whose stock you want to check, Selection date for which you want to see stocks and execute.
3. The radio button Storage Loc./Batch Stock should be selected
2. Below screen appears. Now enter the plant, Storage location combination for your office and the material whose stock you want to check, Selection date for which you want to see stocks and execute.
3. The radio button Storage Loc./Batch Stock should be selected
4. This is a sample view of the executed report
It shows opening stock, quantity of stock received/issued and closing stock
Tcodes for verifying open balances data in SAP
Uncategorized1. Material balance- MB51/MB52
2. Account receivable data – FD03
3. Account payables data- FK03
4. General ledger balance- ZRFBL3N or FAGLL03 ( G/L code :4867100010)
5. budget balance- ZFMRP_RW_BUDCON
6.Customer Advance- ZADVANCE_DEPOSIT
7.Customer booking- FBL5N
8.FCHI – unused PM cheque..
9.To check leave balances t-code :ZHR_EMPDETAILS
10. IPO – IQ09
Tcode for Cheque Transactions in CSI
UncategorizedFCH3: Void unnused cheques (cheques not issued)
FCH9: Void issued cheque (cheque must be created, does not reverse payment)
FCHE: Delete information on voided cheque (cheque must be voided)
FCHD: Delete cheque information created from payment run (cheques created from F110 or F-58)
FCHF: Delete cheque information created manually (cheques created from FCH5)
FCHG: Resets specific information from cheque (voided reason, cashed data or extract data)
FCH8: Reverse payment document from cheque
F & A CSI User Manual related Western Union Cheque Payment transaction as well as Stamp / Postal Stationary and IPO Indent procedure from Head Post Office to CSD through SAP.
UncategorizedCustomer creation in SAP in CSI
UncategorizedStep 5:-It will redirect to CRM webpage, login with same credentials again
Step 6:-Login page will appear as below.
Step 7:-Click on account management & select corporate account.
Step 8:-Corporate customer creation->enter full name,account group. Select Customer type depending upon the customer, address line 1, address line2,Legacy customer id(registered customers BNPL and Advance), city, pin code, country,region,language,post office and press Enter.
Step 9:-Click on the Change Template
Step 10 :-Click on Ok
Step 11:-Click on the Edit
Step 12:- Go to the billing tab and click on the own data. Selectthe customer group depending upon the customer type and click on back button to save.
Step 13 :-Go to Tax classification, click on the help button at Tax Type id and select all the applicable taxes.
Tax Group is selected as full for all the taxable customers and it is selected as NONE for all the non-taxable customers.
Select all the applicable taxes.
Step 14: Click on save button customer id is created.
