PoS Bulk File Generator 1.5.1

Uncategorized
PoS Bulk File Generator 1.0.0 was not compatible with 32bit windows systems. So I have created a new version which supports 32bit systems.

PoS Bulk File Generator 1.5.1 is available in the link given below. 

How to login to the India Post System (PC) using CSI Employee lD [Active Directory Rollout]

Uncategorized
Connect DOP PC with India Post Domain

1. Open Control Panel and click on User Accounts


2. Again click on  User Accounts 

3. Manager User Accounts

4. Click on Add


5. Enter User Name as Your CSI ID, Domain as INDIAPOST and Click on Next.


6. Select Others radio button, select Users from list and click on Finish.

7. Click on OK. 


8. Now Restart PC. Switch to other user. Enter your CSI ID as CSI_ID@IndiaPost.Gov.In, password as Password@123. It will ask you to change password. Enter new password, confirm password and click on OK. A pop up window will be opened and shown message as “Password changed successfully”. Now login with your new password.

9. Now you are login with CSI ID in Department of Posts system. This is mandatory as per security reasons. If it asks for credentials, enter username as doplocadmin, password as Password@123. For any queries, please contact me at: ashokkumar.aleti@ap.gov.in

Note: Before doing the above process, make sure that your PC is in IndiaPost domain.

Postal Manuals / Rulings / Govt Orders – PDF Download

Uncategorized
Postal Manuals – PDF Download


How to Renew the Despatch Schedule in SAP?

Uncategorized
The Procedure for Renewing the Dispatch Schedule is as below:-

1. Divisional SPOC has to login to the PTM module in SAP using Super-user credential shared during creation of dispatch schedule.

2. Go to “Edit Schedule” option under Schedule tab to get the schedule editing screen. 

3. Enter the Schedule ID for which validity has to be extended.

4. Change the “Valid to” date as required and save the same.

5. Login to ECP module of SAP using Divisional head login and download the edited schedule using “ZMOSCHDWNLD”

6. Maintain the edited schedule under “ZMOIPVS” option.

7. After completion of all the above task, Share the schedule ID to tcsdop.sapipvs@tcs.com and tcsdop.pos@tcs.com with a copy of ipvs.cept@indiapost.gov.in,DMCC Chennai, RIT and CIT for pushing the edited schedule data to IPVS Back office.

In this connection, it is requested to direct all the Divisional SPOC to renew the dispatch schedules well in advance before the expiry date to avoid the issues in dispatching the articles in IPVS Back Office.

Procedure to install Mantra devices for IPPB Rollout [Biometric Device Configuration]

Uncategorized
Stop following services (if any there):
1. ACPL FM220 Registered Device service
2. Morpho 

Note: Better uninstall other RD services if not required.

Download Drivers & RD Services:

Download required mantra drivers and RD services from its official sites.


  • Install Mantra MFS100 Driver Setup & MFS100 RD Service as per Operating System.
  • Both Setup should Run as Administrator privileges
  • Restart service in Services.MSC
  • Unplug and plug the Mantra device for ready to use
  • Then change IE settings as mentioned below

  • After IE configuration, the followings sites should be added under trusted sites

https://127.0.0.1:11100/
https://rdtest.aadhaardevice.com/
https://download.mantratecapp.com/

Once the above configuration is done, the below URL may be invoked in IE and the result of the URL is “Can’ reach this page”

https://127.0.0.1:11100/

RD Service Test Application:
1) HTTPS : https://rdtest.aadhaardevice.com/ (Test https URL if your website is in https)

  • By running RD Service Test application, user can detect all RD Services installed in their system.
  • User can get Device Information which is connected to its system by clicking on Discover ADM.
  • By calling capture function of RD service, user can capture biometric data
  • After Success Message Device is ready to capture finger print.

Procedure for registering POSB Net Banking in DOP Finacle

Uncategorized

DOP Finacle Menu : CMRC

Use CMRC menu,
  • Fill all mandatory fields. Mobile Number, eMail ID, PAN Number, Mother’s Maiden Name are Mandatory. Also confirm whether DOB, Full KYC Updated for the requested Account. If KYC Not updated please obtained from the concern and update the same immediately.
  • Click on enable Net banking and submit and verify.
  • You will receive SMS after 24 hours.
  • A SMS containing activation link for enabling Internet Banking option.

About DoP Internet Banking

Uncategorized
Following facilities are available for DOP e banking portal user:

My Profile:

1. Change ‘Sign-on’ and Transaction Password.
2. Set Preferences.
3. Update channel id.
4. View personnel details.

Accounts:

1. Accounts Summary.
2. Savings accounts details.
3. RD account details.
4. PPF accounts details.
5. TD accounts details.
6. NSC Account details.
7. Loan on RD details.
8. Loan on PPF details.
9. Tax deducted at source details.

Transactions:

1. Manage Payee.
2. Manage Billers.
3. Initiate funds Transfer with in DOP.
4. Funds transfer outside DOP.
5. PPF account withdrawal.
6. View scheduled transactions.
7. Pay PPF Account/Repay Loan on PPF.
8. View recurring instructions.
9. Pay RD account.
10. View All Transactions.
11. Repay Loan on RD.

General Services:

1. Mails.
2. Inquiry Facility.
3. Service Requests.

Visit Official Link for more information

Transaction using CTM in IPPB Finacle

Uncategorized
This post will explain how to deposit/withdraw/transfer transaction in IPPB and to familiarize screen for transaction 

Command used for the above mentioned transaction is same as in DOP Finacle but the interface is quite different. CTM

Following screen will appear

Select the Authentication Type (1). Any one of this (Aadhaar number/QR card No/Mobile number/Customer ID) can be selected to proceed. 

Enter the unique ID of the Authentication type selected and click on Fetch Customer Details (2)

Details of the customer will be fetched and following screen will appear


All information of the customer will get fetched and will be displayed.

For proceeding further OTP should be generated and validated.

Though Capture Finger Print option is available to validate, it is now disabled and is directing to proceed with OTP validation. 

For this click on Generate OTP (3)

Six digit OTP will be generated to the customer mobile number

This has to be validated through Validate OTP (4) button.

Identity of the customer should be verified by the customer

Following message should be confirmed by the Official before proceeding


Following screen will appear


This screen displays customer details (on the top) and account number linked with that customer (IPPB and POSB. If POSB ac is not linked, only IPPB account will be displayed)

Click on the IPPB account

Then click on Transaction Type Details (Cash Deposit/Cash Withdrawal/Fund transfer etc) 

Above screen is for Cash Deposit transaction.

Debit account number (Teller account of the official) and Credit account number (Customer Account number) will appear automatically (in case of Deposit transaction)

Enter the Transaction Amount 

For completing this transaction, again OTP validation is there. OTP has to be generated by clicking Generate OTP and should be Validated through Validate OTP.

On successful validation of OTP, Transaction will be completed with a successful message

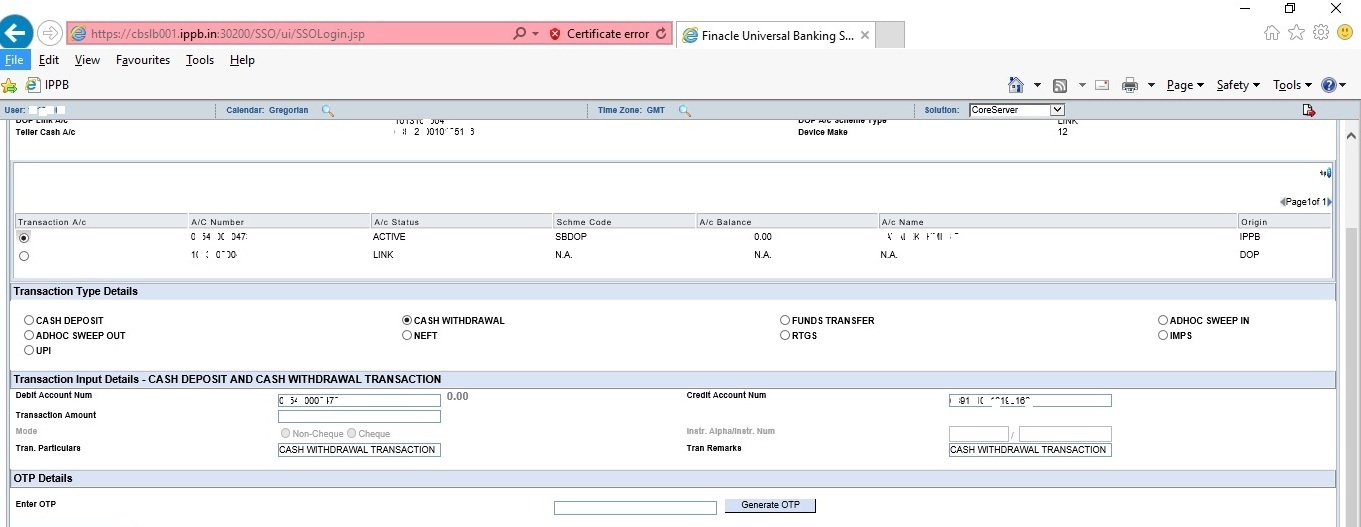
Following is the screen for Cash Withdrawal


Here debit account will be customer account and credit account will be Teller account of the official

Following is the screen for Cash transfer

Here From A/c number will be customer account and To account number will be the account number give by the customer to which amount is to be transferred from his/her account.